移动端组件库
借鉴ant-design-mobile使用gulp开发移动端组件库,使用dumi生成组件库文档,使用uView的色彩,并参考其组件样式
info
本地调试ant-design-mobile:
- node版本切到16.16.0
- nnrm 切到 taobao
- 执行
pnpm i - 更改
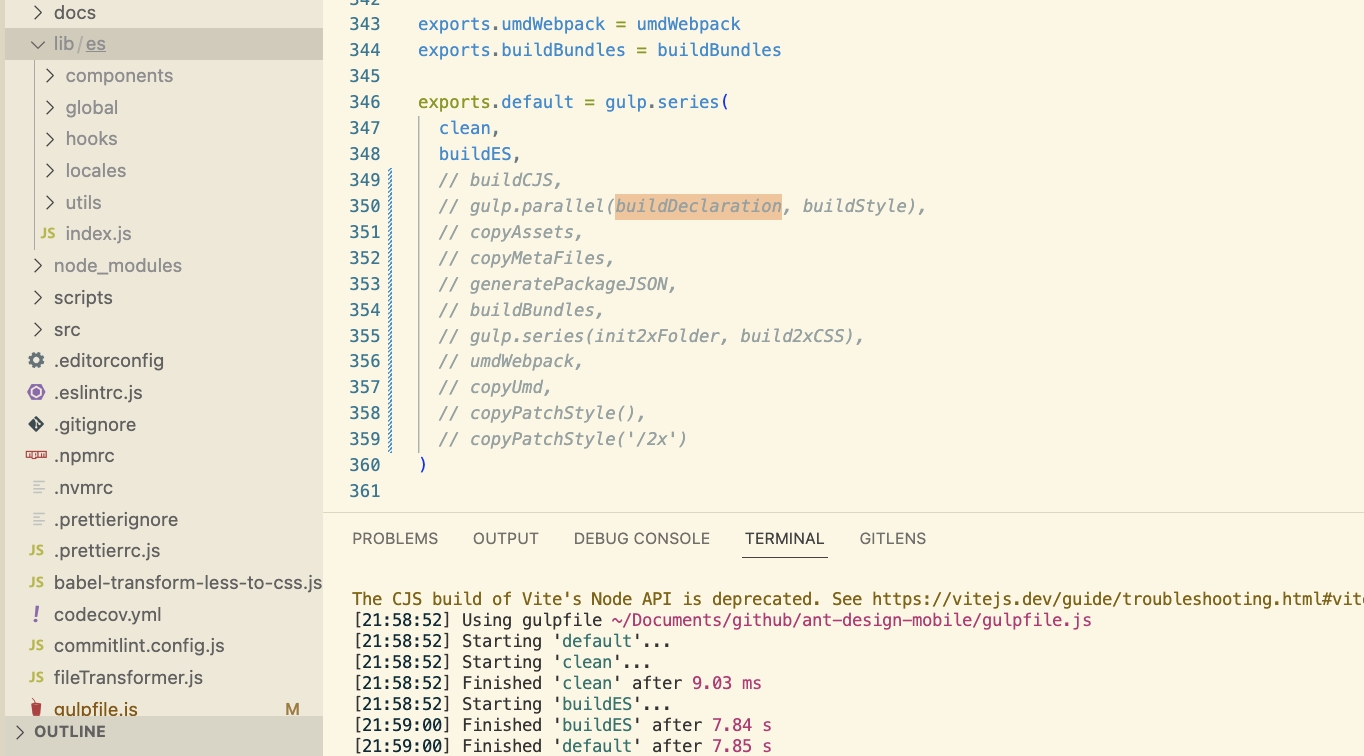
gulpfile.js并执行pnpm build,查看每一步task的产出
ant-design-mobile中的patch CSS 是针对浏览器不支持 CSS 变量的替代方案,比如button.patch.less是将button.less中的CSS 变量转换为不使用CSS 变量。
复用ant-design-mobile的gulpfile.js
执行pnpm build报错:
Cannot find module 'node:path'查看node版本发现是14.14.0,使用nvm use 16.16.0后解决Cannot find module @rollup/rollup-darwin-arm64.解决:删掉pnpm-lock.yaml重新执行pnpm installCannot find module './Foo'. Did you mean to set the 'moduleResolution' option to 'nodenext', or to add aliases to the 'paths' option?解决:tsconfig.json中设置"moduleResolution": "node"SyntaxError in plugin "gulp-babel" index.d.ts: Unexpected token, expected ","解决:tsconfig.json中设置"declaration": falseError in plugin "webpack-stream" Module not found: Error: Can't resolve 'babel-loader'解决:pnpm add -D babel-loaderError in plugin "webpack-stream" Module not found: Error: Cannot find package '@babel/preset-env'解决:pnpm add -D @babel/preset-envpnpm add -D @babel/coreError in plugin "webpack-stream" Module not found: Error: Cannot find package '@babel/preset-typescript'解决:pnpm add -D @babel/preset-typescriptError in plugin "webpack-stream" Module not found: Error: Cannot find package '@babel/preset-react'解决:pnpm add -D @babel/preset-react
使用的依赖包
删除文件
through2
对Node.js Streams.Transform (Streams2/3) 的封装,提供了更为易用的objectMode模式。
@babel/plugin-transform-modules-commonjs
该插件将 ECMAScript 模块转换为 CommonJS。请注意,只有导入/导出语句 (如import "./mod.js") 和导入表达式 (如import('./mod.js')) 的语法被转换
ES Module
export default 42;
转为CommonJS
Object.defineProperty(exports, "__esModule", {
  value: true,
});

exports.default = 42;
postcss-px-multiple
一个 postcss 的插件,可以把 css 文件中含 px 的样式乘以倍数,注意大写的 PX 不会转换。
这个插件对设计稿定义 pt 单位,实际 1pt = 2px 情况下很有用。另外当 viewport 设置成固定值且不为 device-width 时,比如 width=750,当引入第三方组件中的 css 时候,第三方组件一般都是按 device-width 写的尺寸,此时用此插件很好解决问题。
webpack-stream
将 webpack 作为流运行以方便地与 gulp 集成。
classnames
用于有条件地将类名连接在一起。
const classNames = require('classnames');
classNames('foo', 'bar'); // => 'foo bar'

classNames('foo', { bar: true, duck: false }, 'baz', { quux: true }); // => 'foo bar baz quux'

classNames(null, false, 'bar', undefined, 0, { baz: null }, ''); // => 'bar'

const arr = ['b', { c: true, d: false }];
classNames('a', arr); // => 'a b c'
lodash
assignWith(object, sources, [customizer])
const customizer = function(objValue, srcValue, key, object, source) {}
@react-spring/web
React Spring 是一个用于构建交互式、数据驱动和动画 UI 组件的库。它可以为 HTML、SVG、Native Elements、Three.js 等制作动画。
# Install the entire library
npm install react-spring
# or just install your specific target (recommended)
npm install @react-spring/web
yarn add @react-spring/web
pnpm add @react-spring/web
use-sync-external-store
是 React.useSyncExternalStore 的向后兼容垫片。
pnpm add use-sync-external-store
pnpm add -D @types/use-sync-external-store
使用的gulp插件
gulp-typescript
用于处理 TypeScript 编译工作流程的 gulp 插件。该插件暴露TypeScript的编译器options供gulp使用
{ declaration: true }设置编译时是否为每个脚本生成类型声明文件.d.ts{ emitDeclarationOnly: true }设置编译后只生成.d.ts文件,不生成.js文件
gulp-less
gulp-postcss
gulp-replace
gulp-rename
规范提交及代码格式化
husky
自动检查您的提交消息、代码,并在提交或推送时运行测试。
husky 整个安装主要有以下几步:
安装 husky 依赖:
npm install -D husky安装 husky 目录:
npx husky installnpx husky install命令,是为了在项目中创建一个 git hook 目录,同时将本地 git 的 hook 目录指向项目内的 husky 目录。添加 npm prepare 钩子:
npm pkg set scripts.prepare="husky install"info
npm 中也有一些生命周期钩子,prepare 就是其中一个,以下是对他的运行时机介绍:
- 在
npm publish和npm pack期间运行 - 在本地
npm install时运行 - 在prepublish和prepublishOnly期间运行
- 在
添加 git pre-commit 钩子:
npx husky add .husky/pre-commit "npm run test"npx husky add命令用于添加 git hook 脚本, 这个命令中自动添加了文件头及文件可执行权限。
依次执行完这四步,我们就完成了 husky 的安装以及 一个 pre-commit 钩子的创建。总的来说,当执行 npx husky install 时,会通过一个 git 命令,将 git hook 的目录指向 husky 的目录,由于 git 仓库的设置不会同步到远程仓库,所以 husky 巧妙地通过添加 npm 钩子以保证新拉取的仓库在执行 npm install 后会自动将 git hook 目录指向 husky 的目录。
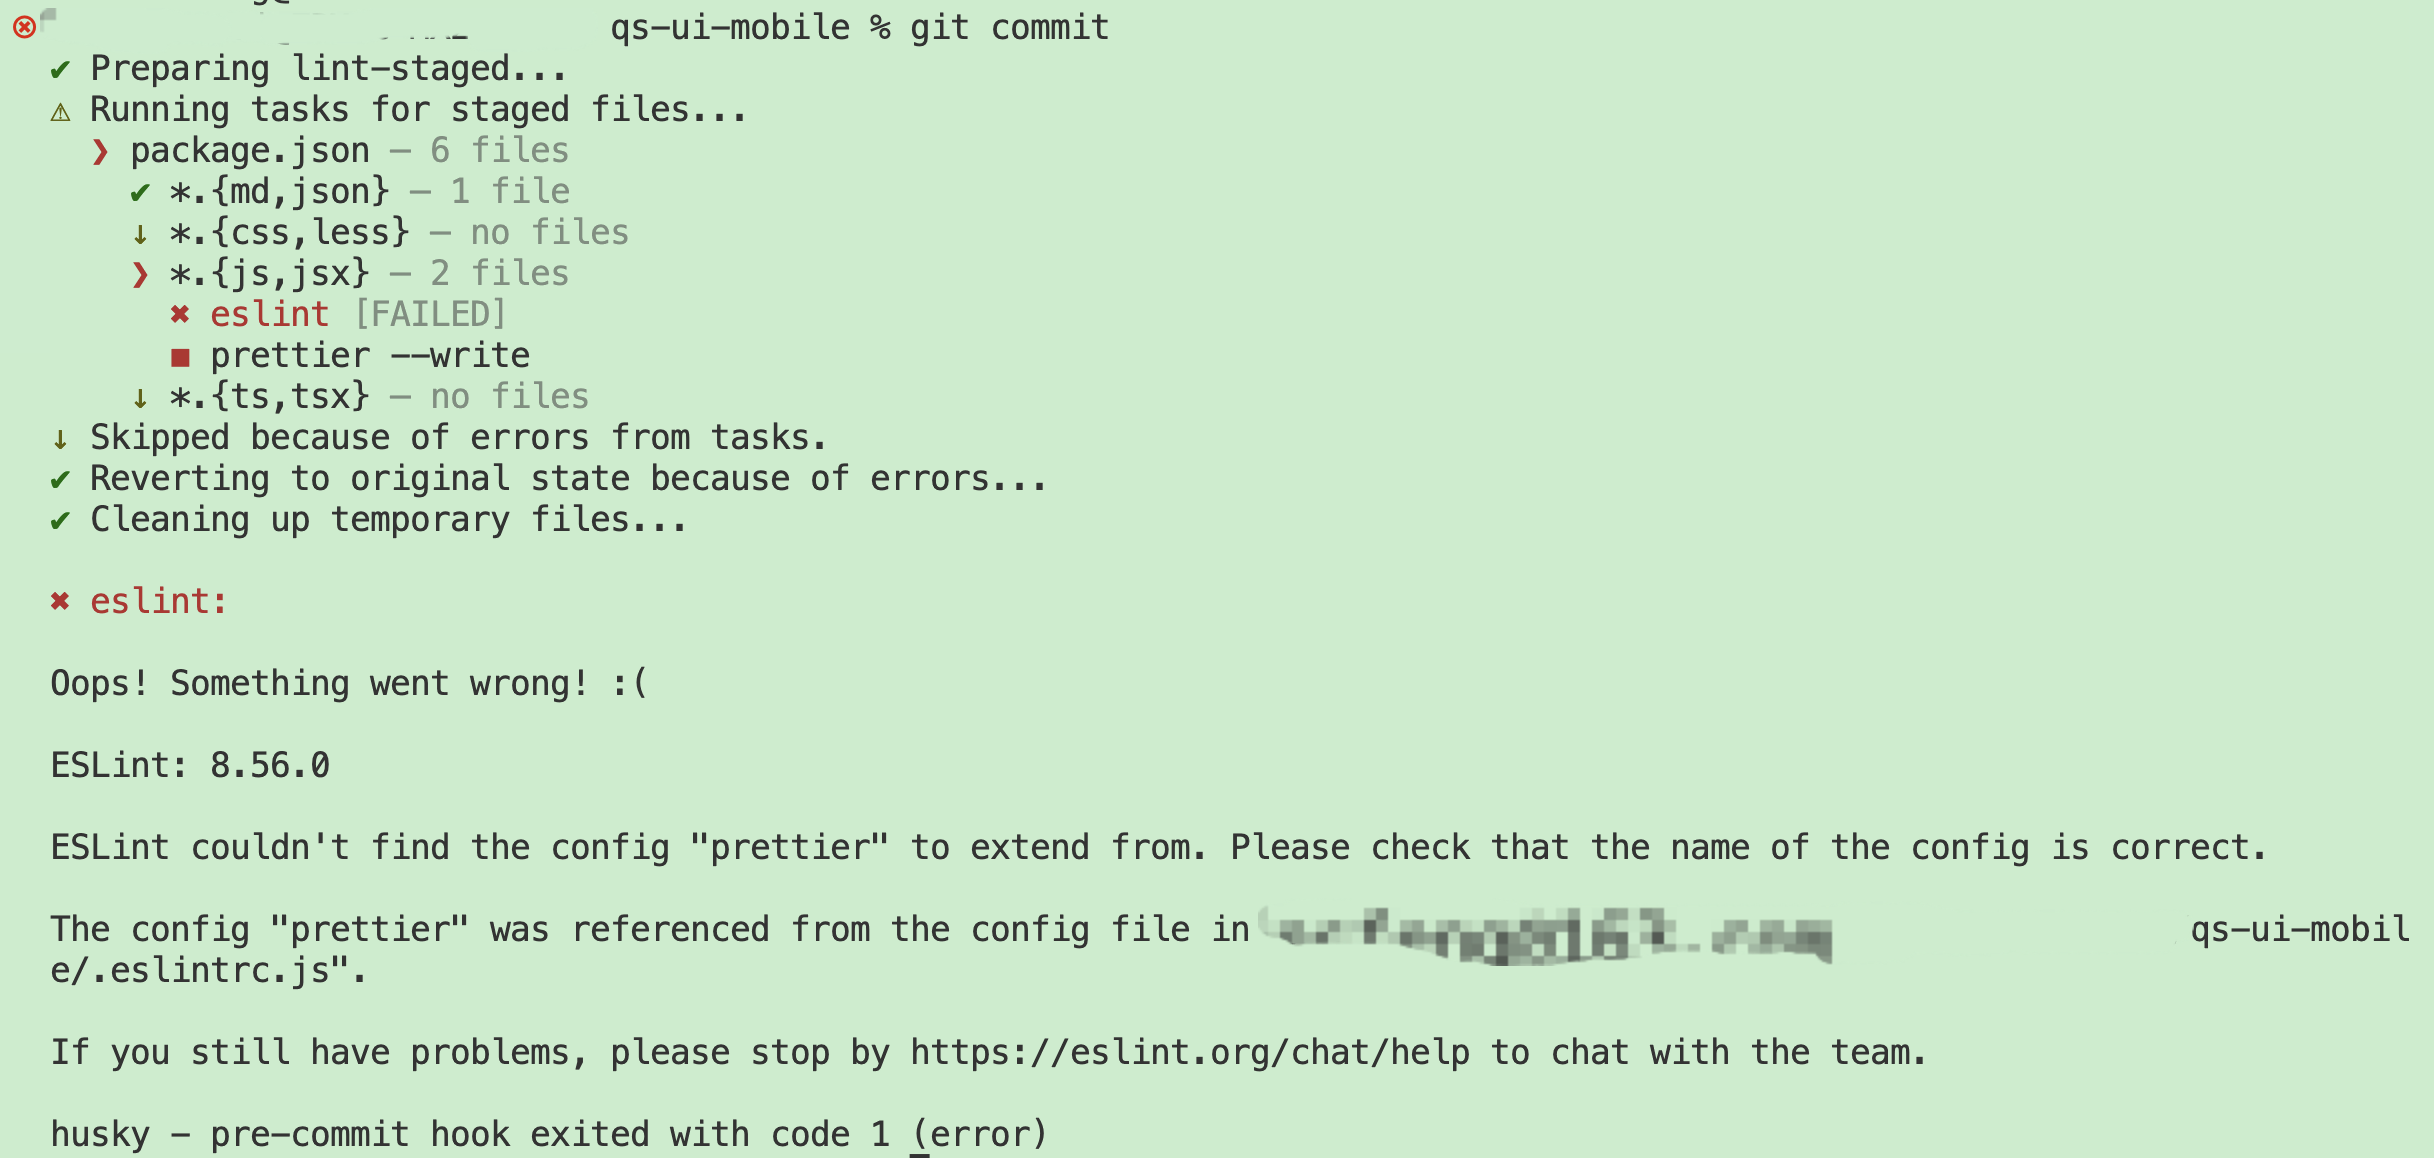
 如图在运行 ESLint 时遇到了错误消息
 "ESLint couldn't find the config 'prettier' to extend from",这意味着 ESLint 无法找到名为 'prettier' 的配置文件来扩展你的 ESLint 配置。这通常是因为你在 ESLint 配置文件中指定了继承自 'prettier' 的配置,但是没有安装相应的 eslint-config-prettier 包。npm install --save-dev eslint-config-prettier
安装完成后,确保你的 ESLint 配置文件(通常是 .eslintrc.js 或 .eslintrc.json)正确地引用了 'prettier' 配置。例如:
{
  "extends": [
    "prettier"
  ]
}
lint-staged
针对暂存的 git 文件运行 linter,不要让它溜进您的代码库!设置pre-commit git hook 来运行 lint-staged
安装:
pnpm add -D lint-staged配置: 可以在
package.json中使用lint-staged字段定义配置;或者在项目根目录下新建lint-staged.config.js或.lintstagedrc.js进行配置package.json"lint-staged": {
"*.{md,json}": [
"prettier --write --no-error-on-unmatched-pattern" // prettier格式化md json类型的文件,当没有匹配到md json类型的文件prettier时不报错
],
"*.{css,less}": [ // 以下多条命令会同时被执行
"stylelint --fix",
"prettier --write" // prettier格式化css less类型的文件
],
"*.{js,jsx}": [
"eslint --fix",
"prettier --write"
],
"*.{ts,tsx}": [
"eslint --fix",
"prettier --parser=typescript --write"
]
},结合husky使用,生成的
.husky/pre-commit文件中:pnpm lint-staged
commitlint
commitlint 帮助您的团队遵守提交约定。
安装:
pnpm add -D @commitlint/cli @commitlint/config-conventional配置
在项目根目录新建
commitlint.config.js或.commitlintrc.js或.commitlintrc或.commitlintrc.json或.commitlintrc.ymlcommitlint.config.jsmodule.exports = {
extends: ['@commitlint/config-conventional'],
rules: {
'header-max-length': [1, 'always', 100], // 提交信息超过100字符则警告
'type-enum': [ // 提交信息非以下类型则报错
2,
'always',
[
'feat',
'fix',
'enhance',
'chore',
'test',
'docs',
'refactor',
'style',
'revert',
],
],
},
};或者在
package.json文件中使用commitlint字段来定义配置package.json"commitlint": {
"extends": [
"@commitlint/config-conventional"
]
},
通过 git hooks 在commit message时立即检查
- 安装husky:
npm install husky --save-dev - 激活hooks:
npx husky install - 添加hook:
npx husky add .husky/commit-msg 'npx --no -- commitlint --edit ${1}'
- 安装husky:

prettier
安装:
pnpm add -D prettier配置:在项目根目录下新建
.prettierrc.js.prettierignore
配置选项:
module.exports = {
  // 1.一行代码的最大字符数,默认是80(printWidth: <int>)
  printWidth: 80,
  // 2.tab宽度为2空格(tabWidth: <int>)
  tabWidth: 2,
  // 3.是否使用tab来缩进,我们使用空格(useTabs: <bool>)
  useTabs: false,
  // 4.结尾是否添加分号,false的情况下只会在一些导致ASI错误的其工况下在开头加分号,我选择无分号结尾的风格(semi: <bool>)
  semi: false,
  // 5.使用单引号(singleQuote: <bool>)
  singleQuote: true,
  // 6.object对象中key值是否加引号(quoteProps: "<as-needed|consistent|preserve>")as-needed只有在需求要的情况下加引号,consistent是有一个需要引号就统一加,preserve是保留用户输入的引号
  quoteProps: 'as-needed',
  // 7.在jsx文件中的引号需要单独设置(jsxSingleQuote: <bool>)
  jsxSingleQuote: false,
  // 8.尾部逗号设置,es5是尾部逗号兼容es5,none就是没有尾部逗号,all是指所有可能的情况,需要node8和es2017以上的环境。(trailingComma: "<es5|none|all>")
  trailingComma: 'es5',
  // 9.object对象里面的key和value值和括号间的空格(bracketSpacing: <bool>)
  bracketSpacing: true,
  // 10.jsx标签多行属性写法时,尖括号是否另起一行(jsxBracketSameLine: <bool>)
  jsxBracketSameLine: false,
  // 11.箭头函数单个参数的情况是否省略括号,默认always是总是带括号(arrowParens: "<always|avoid>")
  arrowParens: 'always',
  // 12.range是format执行的范围,可以选执行一个文件的一部分,默认的设置是整个文件(rangeStart: <int>  rangeEnd: <int>)
  rangeStart: 0,
  rangeEnd: Infinity,
  // 18. vue script和style标签中是否缩进,开启可能会破坏编辑器的代码折叠
  vueIndentScriptAndStyle: false,
  // 19.    endOfLine: "<lf|crlf|cr|auto>" 行尾换行符,默认是lf,
  endOfLine: 'lf',
  // 20.embeddedLanguageFormatting: "off",默认是auto,控制被引号包裹的代码是否进行格式化
  embeddedLanguageFormatting: 'off',
}

// 14. requirePragma: <bool>,格式化有特定开头编译指示的文件 比如下面两种
/**
 * @prettier
 */
// or
/**
 * @format
 */

// 15.insertPragma: <bool> 自当插入pragma到已经完成的format的文件开头

// 16. proseWrap: "<always|never|preserve>" 文章换行,默认情况下会对你的markdown文件换行进行format会控制在printwidth以内

// 13. 指定parser,因为pretter会自动选择,所以一般不用指定(parser: "<string>"  parser: require("./my-parser"))
// "babel" (via @babel/parser) Named "babylon" until v1.16.0
// "babel-flow" (same as "babel" but enables Flow parsing explicitly to avoid ambiguity) First available in v1.16.0
// "babel-ts" (similar to "typescript" but uses Babel and its TypeScript plugin) First available in v2.0.0
// "flow" (via flow-parser)
// "typescript" (via @typescript-eslint/typescript-estree) First available in v1.4.0
// "espree" (via espree) First available in v2.2.0
// "meriyah" (via meriyah) First available in v2.2.0
// "css" (via postcss-scss and postcss-less, autodetects which to use) First available in v1.7.1
// "scss" (same parsers as "css", prefers postcss-scss) First available in v1.7.1
// "less" (same parsers as "css", prefers postcss-less) First available in v1.7.1
// "json" (via @babel/parser parseExpression) First available in v1.5.0
// "json5" (same parser as "json", but outputs as json5) First available in v1.13.0
// "json-stringify" (same parser as "json", but outputs like JSON.stringify) First available in v1.13.0
// "graphql" (via graphql/language) First available in v1.5.0
// "markdown" (via remark-parse) First available in v1.8.0
// "mdx" (via remark-parse and @mdx-js/mdx) First available in v1.15.0
// "html" (via angular-html-parser) First available in 1.15.0
// "vue" (same parser as "html", but also formats vue-specific syntax) First available in 1.10.0
// "angular" (same parser as "html", but also formats angular-specific syntax via angular-estree-parser) First available in 1.15.0
// "lwc" (same parser as "html", but also formats LWC-specific syntax for unquoted template attributes) First available in 1.17.0
// "yaml" (via yaml and yaml-unist-parser) First available in 1.14.0

// 17. htmlWhitespaceSensitivity: "<css|strict|ignore>" html中的空格敏感性

// 针对不同文件或目录设置不同配置的方法,json格式例子
// {
//   "semi": false,
//   "overrides": [
//     {
//       "files": "*.test.js",
//       "options": {
//         "semi": true
//       }
//     },
//     {
//       "files": ["*.html", "legacy/**/*.js"],
//       "options": {
//         "tabWidth": 4
//       }
//     }
//   ]
// }
插件
pnpm add -D prettier-plugin-organize-imports prettier-plugin-packagejson
prettier-plugin-organize-imports按引用深度排序合并 import 声明;移除未使用的 import 声明。使用Prettier2版本 的话,Prettier将自动加载该插件。无需配置。prettier-plugin-packagejson合理排序package.json的 key 顺序
Prettier 3 使用插件:
{
  "plugins": ["prettier-plugin-organize-imports"]
}
pretty-quick
pretty-quick 是一个 NPM 包,它是 Prettier 的一个封装,用于在 Git 提交时自动格式化你的代码。它可以作为一个 pre-commit 钩子与 Husky 一起使用,以确保在代码提交到仓库之前,它们已经被格式化。这有助于保持代码库的一致性和可读性。
pretty-quick --staged 是一个命令,用于运行 pretty-quick 工具,它会检查并格式化所有已经暂存(staged)的文件。这通常在一个 Git pre-commit 钩子中使用,以确保只有那些即将被提交的文件被格式化。这样可以避免对未暂存或未跟踪的文件进行不必要的格式化操作。
stylelint
Stylelint是一个强大、先进的 CSS 代码检查器(linter),可以帮助你规避 CSS 代码中的错误并保持一致的编码风格。
安装 Stylelint 及其 标准配置:
npm install --save-dev stylelint stylelint-config-standard在项目的根目录中创建 .stylelintrc.json 配置文件,并写入以下内容:
{
  "extends": "stylelint-config-standard"
}
让 Stylelint 处理项目中的所有 CSS 文件:
npx stylelint "**/*.css"
可以在根目录下创建.stylelintignore文件来配置允许Stylelint忽略的文件,比如:
test/**/*.less
当被检查的文件全都在.stylelintignore中配置的规则下时,执行stylelint会报错:Error: All input files were ignored because of the ignore pattern. Either change your input, ignore pattern or use "--allow-empty-input" to allow no inputs,可以使用stylelint --allow-empty-input
eslint
ESLint 是一个静态代码分析工具,用于识别和报告 ECMAScript/JavaScript 代码中的模式和错误。其目标是使代码更加一致并避免错误。
在项目中手动设置ESLint
安装:
npm install --save-dev eslint在项目根目录新建
.eslintrc.js,增加配置,例如:.eslintrc.jsmodule.exports = {
"env": {
"browser": true,
"es2021": true
},
"extends": "eslint:recommended",
"parserOptions": {
"ecmaVersion": "latest",
"sourceType": "module"
},
}使用 ESLint CLI 的 Lint 代码:
npx eslint project-dir/ file1.js
使用命令设置ESLint
可以使用以下命令安装和配置 ESLint:npm init @eslint/config
配置项
module.exports = {
  /*
  对于项目中的某些文件,我们想跳过 eslint 对它们的检查,可以配置 ignorePatterns 字段。告诉 eslint 忽略某些文件。
  */
  ignorePatterns: ['/*', '!/src', '/src/**/*.js'],
  /*
  env 字段用于配置项目的工作环境可用的全局 API,例如,某个项目是基于 Nodejs 开发的,那自然没有 BOM 和 DOM 两个对象的全局 API。
  */
  'env': {
    'browser': true,
    'es6': true,
  },
  /*
  extends 字段用来继承来自其他的规则、插件和语言选项的共享配置。例如 eslint 内置通用的核心规则插件 eslint:recommended,这样我们就不手动一个个去定义规则了。
  */
  'extends': [
    'eslint:recommended',
    /*
    对应的依赖包为eslint-plugin-react
    */
    'plugin:react/recommended',
    /*
    对应的依赖包为eslint-plugin-react-hooks
    */
    "plugin:react-hooks/recommended",
    /*
    对应的依赖包为@typescript-eslint/eslint-plugin
    */
    'plugin:@typescript-eslint/eslint-recommended',
    'plugin:@typescript-eslint/recommended',
    /*
    对应的依赖包为eslint-config-prettier,告诉 ESLint 使用 eslint-config-prettier 包提供的规则来覆盖可能与 Prettier 冲突的 ESLint 规则。
    */
    'prettier',
  ],
  /*
  eslint 最核心的功能就是负责将文件内的 javascript 代码转换成 AST(抽象语法树)去解析代码的格式、代码语法等。那么做这个功能的就是 eslint 提供的 parser 接口,eslint 内置的 parser 是 Espree。我们还可以使用其他的 parser,它只需要能够符合 eslint 的parser 接口,比如@typescript-eslint/parser
  */
  'parser': '@typescript-eslint/parser',
  /*
  parser的配置项
  */
  'parserOptions': {
    'project': 'tsconfig.json',
    'sourceType': 'module',
  },
  /*
  一个 plugin 定义了一组规则、环境和配置。
  */
  'plugins': ['@typescript-eslint'],
  /*
  eslint 预设了很多的规则来保证代码的可靠性。规则的值可以是
  - off 或者 0, 表示关闭规则
  - warn 或者 1, 表示开启规则,当代码未能通过该规则时,代码的下划线展示黄色的波浪线
  - error 或者 2,表示开启规则,当代码未能通过该规则时,代码的下划线部分展示红色的波浪线
  */
  'rules': {
    '@typescript-eslint/explicit-function-return-type': 'off',
    '@typescript-eslint/explicit-module-boundary-types': 'off',
    '@typescript-eslint/no-explicit-any': 'off',
    '@typescript-eslint/no-empty-interface': 'off',
    '@typescript-eslint/no-use-before-define': 'off',
    '@typescript-eslint/no-inferrable-types': 'off',
    '@typescript-eslint/camelcase': 'off',
    'react/prop-types': 'off',
    'react/jsx-no-target-blank': 'off',
    '@typescript-eslint/ban-ts-ignore': 'off',
    'no-case-declarations': 'off',
    'no-prototype-builtins': 'off',
    '@typescript-eslint/no-empty-function': 'off',
    'no-inner-declarations': 'off',
    'react/no-unescaped-entities': 'off',
    '@typescript-eslint/no-unused-vars': [
      'warn',
      {
        ignoreRestSiblings: true,
      },
    ],
    'no-empty': [
      'error',
      {
        allowEmptyCatch: true,
      },
    ],
    'no-constant-condition': [
      'error',
      {
        checkLoops: false,
      },
    ],
    '@typescript-eslint/ban-types': [
      'error',
      {
        extendDefaults: true,
        types: {
          '{}': false,
        },
      },
    ],
    // 下面的是临时规则
    'react/display-name': 'off',
  },
  /*
  使用 settings 来指定应该在所有规则中共享的信息。
  */
  settings: {
    react: {
      version: 'detect',
    },
  },
  /*
  overides 字段用于对目录下的某些特定的文件配置相关的 rule 或者 parser。
  */
  overrides: [
    {
      'files': ['**/demos/**/*'],
      'rules': {
        'react/react-in-jsx-scope': 'off',
        'react/display-name': 'off',
      },
    },
    {
      'files': ['**/tests/**/*'],
      'rules': {
        'react/react-in-jsx-scope': 'off',
        'react/display-name': 'off',
        '@typescript-eslint/no-unused-vars': 'off',
      },
    },
  ],
}
导出约定
- 每个组件都有1个单独的文件夹,该文件夹下的
index.ts用于默认导出,其他文件都使用命名导出 - 组件库
src/index.ts使用重新导出语法
相比ant-design-mobile的改动点
cloneElement不建议再使用了。替代方案:使用 render prop 传递数据。把ant-design-mobile的src/utils/native-props.ts改写为src/utils/render-native-props.tsuse-sync-external-store是React.useSyncExternalStore的向后兼容垫片。useSyncExternalStore是React 18新增的一个Hook。想将import {useSyncExternalStore} from 'use-sync-external-store/shim'改为import {useSyncExternalStore} from 'react',考虑到使用组件库的项目依赖的React版本可能低于18,所以不改动。
对ant-design-mobile的疑问点
dot-loading的实现
<svg height='1em' viewBox='0 0 100 40'>
  <g stroke='none' strokeWidth='1' fill='none' fillRule='evenodd'>
    <g transform='translate(-100.000000, -71.000000)'>
      <g transform='translate(95.000000, 71.000000)'>
        <g transform='translate(5.000000, 0.000000)'>
          <rect width='8' height='8' x='20' y='16' />
        </g>
      </g>
    </g>
  </g>
</svg>
为啥使用
<g>元素进行多次平移?不使用g transform也能实现同样的效果<svg height='1em' viewBox='0 0 100 40'>要想形状大小自动适配字号,则需要svg的内部元素可以缩放,就需要设置viewBox属性;形状大小自动适配字号,则指定svg的高度与父元素文本字体大小保持一致(即设置svgheight='1em'),根据设置viewBox的宽高,就可以自动计算出svg的宽度(svg的宽=指定的高*(viewBox宽/viewBox高)16px*(100/40)=40px),以及其内部元素的缩放比例(<rect>的宽高为指定值*(指定svg的高/viewBox高)8*(16px/40)=3.2px缩小了2.5倍)。为啥指定viewBox='0 0 100 40'?为啥使用
<g>元素 统一设置fill='none' fillRule='evenodd'?
spin-loading的实现
const motionReduced = useMotionReduced()
const { percent } = useSpring({
  cancel: motionReduced,
  loop: {
    reverse: true,
  },
  from: {
    percent: 80,
  },
  to: {
    percent: 30,
  },
  config: {
    duration: 1200,
  },
})
cancel: motionReduced的意义是啥?看commit message是'adduseMotionReducedto prevent infinite animation calculation in react-spring'防止react-spring中的无限动画计算
src/utils/reduce-and-restore-motion.ts
import { Globals } from '@react-spring/web'
import { useSyncExternalStore } from 'use-sync-external-store/shim'

let reduced = false

const subscribers = new Set<() => void>()

function notify() {
  subscribers.forEach(subscriber => {
    subscriber()
  })
}

export function reduceMotion() {
  reduced = true
  notify()
  Globals.assign({
    skipAnimation: true,
  })
}

export function restoreMotion() {
  reduced = false
  notify()
  Globals.assign({
    skipAnimation: false,
  })
}

export function isMotionReduced() {
  return reduced
}

function subscribe(onStoreChange: () => void) {
  subscribers.add(onStoreChange)
  return () => {
    subscribers.delete(onStoreChange)
  }
}

export function useMotionReduced() {
  return useSyncExternalStore(subscribe, isMotionReduced, isMotionReduced)
}
Globals.assign不影响reduceMotion和restoreMotion的使用(查看qs-ui-mobile的减弱动效中的例子)不调用
notify()则不生效Globals.assign可以单独使用,即不与useSyncExternalStore结合使用,但是会造成页面卡死Globals.assign与useSyncExternalStore结合使用,reduceMotion和restoreMotion中如果只想使用Globals.assign,而不调用notify(),则会造成页面卡死useMotionReduced没被使用的话(指的是useMotionReduced的返回值没用于useSpring),直接通过reduceMotion和restoreMotion来使用Globals.assign,也会造成页面卡死,可能这就是spin-loading的cancel: motionReduced的意义通过
reduceMotion和restoreMotion来使用Globals.assign,如果自定义组件也使用了react-spring,则调用reduceMotion或者restoreMotion后能控制所有动画(包括自定义组件的动画),但页面会卡死;如果自定义组件使用了useMotionReduced来控制动画的动与静(控制其他行为如loop则页面仍会卡死),则调用reduceMotion或者restoreMotion后能控制所有动画(包括自定义组件的动画),并且页面不会卡死
组件库文档工具
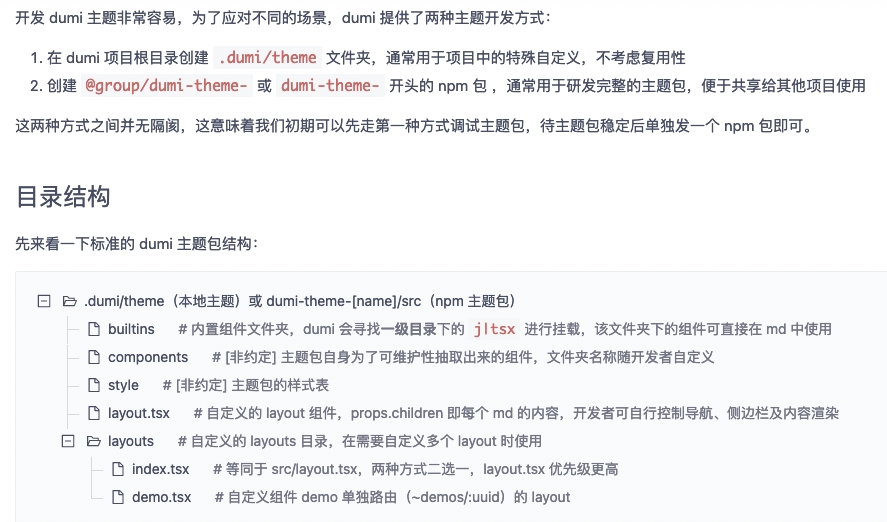
主题目录结构:

dumi2.x
使用 React Library 模板
# 先找个地方建个空目录。
mkdir myapp && cd myapp

# 通过官方工具创建项目,选择你需要的模板
npx create-dumi

# 选择一个模板
? Pick template type › - Use arrow-keys. Return to submit.
❯   Static Site # 用于构建网站
    React Library # 用于构建组件库,有组件例子
    Theme Package # 主题包开发脚手架,用于开发主题包

# 安装依赖后启动项目
npm start
生成的工程中的.dumi目录不用push到远程,每次执行pnpm start都会生成这个目录
主题目录结构
当 dumi 提供的默认主题无法满足项目需要时,即可选择对 dumi 的默认主题进行局部定制或全部定制。无论是单独发布的主题包(dumi-theme-[name]/src/)还是项目本地主题包(.dumi/theme/),都应符合如下目录结构:
.
├── builtins         # 全局组件,注册的组件可直接在 Markdown 中使用
│   ├── Hello          # {Component}/index.tsx 会被识别,可在 md 里使用 <Hello></Hello>
│   │   └── index.tsx
│   └── World.tsx      # {Component}.tsx 会被识别,可在 md 里使用 <World></World>
├── locales          # 国际化文案,通过 `import { useIntl, FormattedMessage } from 'dumi'` 来调用文案,自动根据当前的 locale 切换
│   └── zh-CN.json
├── layouts          # 布局组件,会被 dumi 直接引用
│   ├── GlobalLayout   # 全局 Layout,通常用来放置 ConfigProvider
│   ├── DocLayout      # 文档 Layout,包含导航、侧边菜单、TOC 等,包裹 Markdown 正文做渲染
│   └── DemoLayout     # 组件示例 Layout,需要控制 demo 独立访问页(`/~demos/:id`)的布局时使用
├── slots            # 局部组件(具体有哪些组件取决于主题包实现,应由布局组件引用,以下仅为举例示意)
│   ├── Navbar         # 导航栏
│   ├── NavbarLogo     # 导航栏 LOGO 区域
│   ├── SideMenu       # 侧边栏
│   ├── Homepage       # 首页内容
│   └── HomepageHero   # 首页 Hero 区域
└── plugin           # dumi 插件文件夹,plugin/index.ts(也可以是 plugin.ts)会被自动注册为插件
    └── index.ts
移动端组件研发
只需要安装移动端组件研发主题即可: pnpm add -D dumi-theme-mobile@^2.0.0
配置项
配置文件为根目录下的.dumirc.ts
resolve.atomDirs用于配置资产(例如组件、函数、工具等)路由。默认值为[{ type: 'component', dir: 'src' }]。在默认配置下,src/Foo/index.md将被解析为components/foo的路由。如下,将src/components/button/index.md解析为components/button.dumirc.tsresolve: {
atomDirs: [
{
type: 'component',
dir: 'src/components',
}
],
},warning
配置
resolve.atomDirs后发现,在src/components/*/demos中的文件名不能重复,否则会覆盖,比如src/components/loading/index.md中引用dot-loading和spin-loading的demo:## DotLoading 点状加载中
<code src="../dot-loading/demos/demo1.tsx"></code>
## SpinLoading 转圈加载中
<code src="../spin-loading/demos/demo1.tsx"></code>虽然是不同的目录,但是都是
demo1,则下面的会覆盖上面的themeConfig.logo配置导航栏上的站点 LOGO,如果需要配置为本地图片文件,可将图片资源放入public文件夹,例如放置public/logo.png,则配置'/logo.png'即可。配置为false时不展示 LOGO。themeConfig.navlink为路由,比如,基于以上resolve.atomDirs配置,要link到src/components/button/index.md则设置link为'/components/button'.dumirc.tsthemeConfig: {
nav: [
{ title: '指南', link: '/guide/theming' },
{ title: '组件', link: '/components/button' },
],
},themeConfig.name配置导航栏上的站点名称,不配置时不展示。themeConfig.footer配置页脚内容,可以是 HTML,配置false时不展示。alias配置别名,对 import 语句的 source 做映射。.dumirc.tsalias: {
'demos': '/src/components/demos/index.ts'
},favicons配置站点favicon.dumirc.tsfavicons: ['/logo.png'], // 确保你的项目含有 `public/logo.png`
首页渲染
站点首页为docs/index.md,该markdown文档中的一级目录用于设置首页的页面title
---
hero:
  title: QS UI Mobile
  description: A react UI library for building mobile web apps
  actions:
    - text: 开始使用
      link: /guide/theming
    - text: GitHub
      link: https://github.com/fqishuai/qs-ui-mobile
features:
  - title: 体验
    emoji: 💎
    description: 参考ant-design-mobile和uView中组件的外观及交互,助力打造极致体验的产品
  - title: 外观
    emoji: 🌈
    description: 基于 CSS 变量,便于高效地调整组件的外观或创建自己的主题
  - title: 性能
    emoji: 🚀
    description: 无需配置,即可拥有极致性能
---

# QS UI Mobile <!-- 用于设置首页的页面title -->
常见问题
dumi 和 Umi 的关系是什么?
Umi 是前端开发框架,适用于前端应用研发;dumi 是在 Umi 的基础上打造的静态站点框架,适用于组件研发。
如何完全自定义首页?
创建
.dumi/pages/index.tsx即可用 React 来编写首页,注意不要同时在文档解析的根目录中创建index.md,会导致路由冲突。为什么不支持 CSS Modules?
主要两个原因:
- 使用者很难覆写样式,因为最终
className不稳定 - 自动 CSS Modules 依赖 babel 编译产物,给使用项目带来额外的编译成本,而大部分框架默认都不编译
node_modules(比如 Umi 框架就需要配置extraBabelIncludes才会编译node_modules下的产物)
也许大部分人选择在组件库项目中使用CSS Modules,是因为做前端应用研发时的习惯性选型,但它其实不适合组件库项目;另外,原因 2 也会产生额外的调试成本,比如『为什么 dev 生效、发布后在项目里不生效?』造成的调试成本
- 使用者很难覆写样式,因为最终
dumi1.x
目录结构:
/configdumi配置文件,用于配置菜单、导航栏、主题、插件、别名等.dumi用于存放自定义的dumi插件及主题
发布npm包
antd-tools
使用@ant-design/tools比对npm包
npm install -D @ant-design/tools
# 全局
npm install -g @ant-design/tools
minimist